


If you’ve tried making oat milk at home, you’ve probably experienced the biggest frustration—it turns into a thick, slimy drink instead of the smooth, creamy texture you expect. The good news is that homemade oat milk, not slimy is absolutely possible. By understanding a little kitchen science and following a few simple techniques, you can make delicious barista-style oat milk at home for around $0.50 per liter, saving money while reducing packaging waste. Whether you’re pouring it over cereal, adding it to smoothies, or frothing it for your morning latte, this recipe delivers a silky, dairy-free milk without the unpleasant slime.
Why Make Oat Milk at Home?
Store-bought oat milk has become increasingly expensive, especially premium barista blends. While they’re convenient, buying cartons every week can quickly add up.
Making oat milk yourself offers several benefits:
- Costs only a fraction of store-bought versions
- Uses simple pantry ingredients
- No unnecessary preservatives
- Easy to customize sweetness and flavor
- Reduces packaging waste
- Fresh whenever you need it
If you’re looking for budget vegan dairy alternatives, homemade oat milk is one of the most affordable options available.
Why Does Homemade Oat Milk Become Slimy?
The biggest challenge with homemade oat milk is texture.
Many first-time recipes result in oat milk that feels thick, sticky, or slippery instead of smooth.
So what causes the slime?
The answer lies in the starch naturally found in oats.
When oats are exposed to:
- Warm water
- Too much blending
- Excess friction from the blender
their starch begins to gelatinize.
Gelatinized starch absorbs water and creates the familiar slimy texture that many people dislike.
Understanding this simple bit of food science makes it much easier to avoid the problem.
The Science Behind the Slime
Oats contain natural starches that respond to both heat and mechanical friction.
When blending continues for too long, the blender blades generate heat through friction. Combined with water, this activates the starch molecules.
The result is:
- Thick consistency
- Sticky mouthfeel
- Slimy texture
- Poor frothing ability
The goal isn’t to remove the starch entirely—it’s to prevent it from activating too much during preparation.
Fortunately, there’s an easy solution.
The Secret: The Ice Water Technique
The simplest way to make homemade oat milk not slimy is to keep everything as cold as possible.
This is commonly known as the Ice Water Technique.
Instead of using room-temperature water, use plenty of ice-cold water. The lower temperature helps prevent starch gelatinization while blending.
Combined with a very short blending time, this technique creates oat milk that tastes remarkably similar to commercial versions.
The three golden rules are:
- Use ice-cold water.
- Blend only 20–30 seconds.
- Never squeeze the strained oats.
Following these rules makes all the difference.
Ingredients
You’ll need only a handful of ingredients.
Basic Recipe
- 1 cup rolled oats
- 4 cups ice-cold filtered water
- 2–3 ice cubes
- Pinch of salt
Optional for Barista Quality
- 2 raw cashews
Optional flavor additions:
- 1 teaspoon vanilla extract
- 1–2 dates
- Maple syrup
- Cinnamon
The raw cashews are the secret ingredient that creates the rich texture associated with DIY barista oat milk without making the milk heavy.
Equipment You’ll Need
No special equipment is required.
Gather:
- Blender
- Large bowl
- Pitcher or bottle
- Funnel
- Clean cotton t-shirt or tightly woven cloth
Avoid using a nut milk bag if possible.
Why You Shouldn’t Use a Nut Milk Bag
This surprises many people.
Nut milk bags work wonderfully for almond milk.
They are not ideal for oat milk.
Because the mesh is extremely fine, they trap starch and encourage squeezing.
Squeezing forces more starch through the cloth, making the milk slimier.
Instead, use:
- Clean cotton t-shirt
- Flour sack towel
- Thin cotton cloth
Allow gravity to do most of the work.
Do not twist or squeeze the cloth.
Patience creates smoother milk.
Step-by-Step Recipe
Step 1: Chill Everything
For the best results:
- Refrigerate your water beforehand.
- Add several ice cubes.
- Use cold oats if possible.
Keeping ingredients cold is the first defense against slime.
Step 2: Blend Briefly
Add to the blender:
- Oats
- Ice water
- Salt
- Cashews (if using)
Blend for only 20–30 seconds.
Resist the temptation to blend longer.
Long blending generates heat and activates starch.
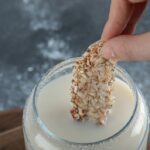
Step 3: Strain Carefully
Place your clean cotton cloth over a bowl.
Slowly pour the blended mixture through it.
Let gravity separate the liquid naturally.
Most importantly:
Do not squeeze the cloth.
Even though you’ll see liquid remaining inside, squeezing releases additional starch that makes the oat milk gummy.
Step 4: Bottle and Refrigerate
Transfer the strained oat milk into a glass bottle or airtight container.
Refrigerate immediately.
Shake well before every use since homemade oat milk naturally separates.
How the Cashews Create Barista-Style Creaminess
Commercial barista oat milk often contains oils and stabilizers to improve texture and foam.
At home, you can achieve similar creaminess naturally.
Adding just one or two raw cashews provides:
- Richer mouthfeel
- Better latte foam
- Creamier texture
- Improved coffee performance
The amount is so small that it doesn’t overpower the oat flavor.
This simple addition makes excellent DIY barista oat milk for cappuccinos and flat whites.
Tips for Perfect Homemade Oat Milk Every Time
Making great oat milk is easy once you know the small details.
Always Use Rolled Oats
Quick oats release starch more rapidly.
Steel-cut oats don’t blend well.
Old-fashioned rolled oats provide the best balance.
Never Blend Too Long
This is probably the biggest mistake beginners make.
Twenty to thirty seconds is enough.
Longer blending does not produce smoother milk.
Instead, it creates slime.
Keep Everything Cold
Cold temperatures protect the starch from breaking down.
Even your blender jar can be chilled beforehand for extra insurance.
Don’t Press the Cloth
It may feel wasteful.
However, squeezing releases starch and tiny oat particles into the milk.
The slight loss in volume is worth the dramatically improved texture.
Flavor Variations
After perfecting the basic recipe, try adding different flavors to create your own variations.
Popular options include:
Vanilla Oat Milk
Add:
- Vanilla extract
- Tiny pinch of sea salt
Perfect for coffee and cereal.
Cinnamon Oat Milk
Blend with:
- Ground cinnamon
- Small date
Great for oatmeal or smoothies.
Chocolate Oat Milk
Blend in:
- Cocoa powder
- Maple syrup
A healthier homemade chocolate drink.
Unsweetened Oat Milk
Skip all sweeteners for maximum versatility in cooking and baking.
How Long Does Homemade Oat Milk Last?
Since it contains no preservatives, homemade oat milk has a shorter shelf life.
Store it in the refrigerator for approximately:
3 to 5 days
Always:
- Shake before using.
- Keep refrigerated.
- Smell before drinking.
If it develops an unusual odor or taste, discard it.
Can You Froth Homemade Oat Milk?
Yes.
Thanks to the addition of cashews, this recipe froths surprisingly well.
While it may not create foam quite as stable as some commercial barista blends containing emulsifiers, it works beautifully for:
- Lattes
- Cappuccinos
- Matcha
- Hot chocolate
Using a handheld frother or steam wand gives the best results.
Ways to Use Homemade Oat Milk
Your fresh oat milk is incredibly versatile.
Use it in:
- Coffee
- Tea
- Smoothies
- Overnight oats
- Pancakes
- Muffins
- Soups
- Creamy pasta sauces
- Baking recipes
- Breakfast cereals
Its subtle taste pairs well with both sweet and savory recipes.
What to Do with Leftover Oat Pulp
Don’t throw away the strained oats.
Repurposing them supports a zero waste milk lifestyle.
Ideas include:
- Add to pancake batter
- Stir into muffin recipes
- Mix into oatmeal cookies
- Blend into smoothies
- Add to homemade granola
- Compost if you cannot use it
Reducing food waste saves both money and resources.
Save Money by Making Oat Milk at Home
One of the biggest advantages of homemade oat milk is cost.
A single bag of rolled oats can produce many liters of milk for only pennies per serving.
Compared to buying premium cartons every week, making your own can significantly save money on groceries over the course of a year.
For families that regularly consume plant-based milk, the savings can be substantial.
Common Mistakes to Avoid
Avoid these common errors for consistently smooth oat milk:
- Using warm water
- Blending longer than 30 seconds
- Squeezing the cloth
- Using instant oats
- Leaving oat milk unrefrigerated
- Forgetting to shake before serving
Correcting these small mistakes makes a dramatic difference in texture.
Frequently Asked Questions
Can I use steel-cut oats?
Rolled oats are recommended because they blend evenly and create a smoother consistency.
Why does my oat milk separate?
Natural separation is completely normal because homemade oat milk contains no stabilizers.
Simply shake before each use.
Can I freeze oat milk?
Yes, although the texture may change slightly after thawing. Shake or blend briefly before using.
Is homemade oat milk healthier?
Homemade oat milk allows you to control every ingredient. You can avoid added oils, preservatives, and excess sugar often found in commercial products.
Final Thoughts
Making homemade oat milk not slimy is much easier than most people think once you understand the science behind it. By using the Ice Water Technique, blending for only 20–30 seconds, and straining through a clean cotton t-shirt without squeezing, you can create smooth, creamy oat milk that rivals store-bought versions. Adding just a couple of raw cashews gives your DIY barista oat milk the rich texture needed for frothy coffees and creamy recipes—all without expensive additives.
Best of all, this simple recipe helps you embrace budget vegan dairy options, save money on groceries, and support a more sustainable, zero waste milk lifestyle. With just a few inexpensive ingredients and the right technique, you’ll enjoy fresh, delicious oat milk at home whenever you need it—without the slime and without the high price tag.